CyberArk Identity and OIDC (OpenID Connect) in ASP.NET Core 7.0 Application - Part 1: Authentication

In this tutorial, will demonstrate how quickly and securely setup user authentication with CyberArk Identity and OIDC (OpenID Connect) in ASP.NET Core 7.0 web application.
Prerequisites
- Visual Studio Code or any IDE that supports ASP.NET application
- .NET 7.0 SDK
- CyberArk Identity
Demo
Create a Web App in CyberArk Identity
Log in to CyberArk Identity Admin Portal and Navigate to App & Widgets -> Web Apps menu, then click on Add Web Apps button.
On the Add Web Apps screen, choose Custom and click on Add button next to OpenID Connect. Click Yes on confirmation and click close.
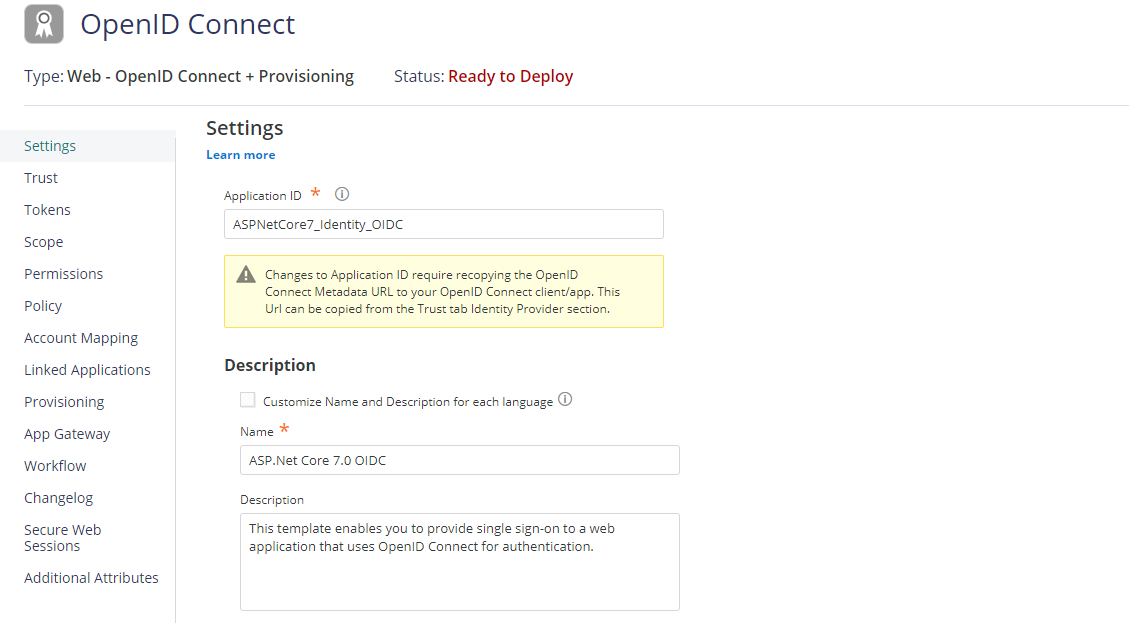
Once closed, page will be redirected to Settings tab of OIDC application.
In Settings tab, Provide the Application ID, value must be unique across your CyberArk Identity tenant. Enter Application Name and click on Save.
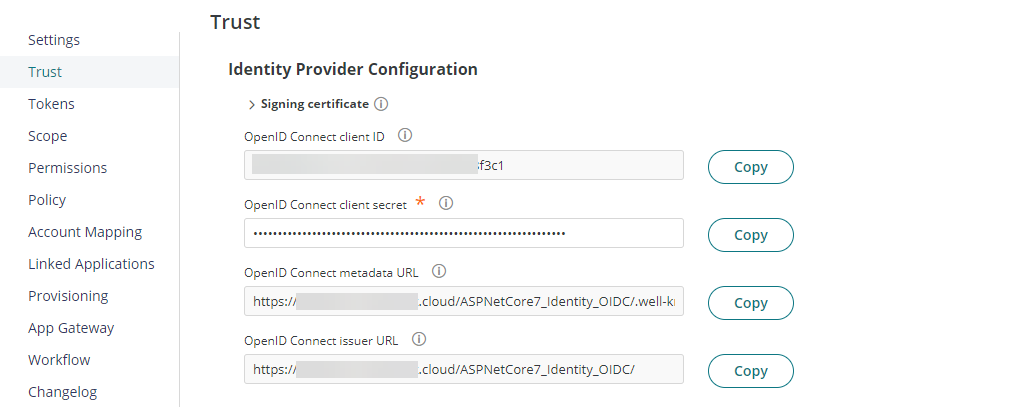
Click on Trust tab, Under Identity Provider Configuration, enter OpenID Connect client secret.
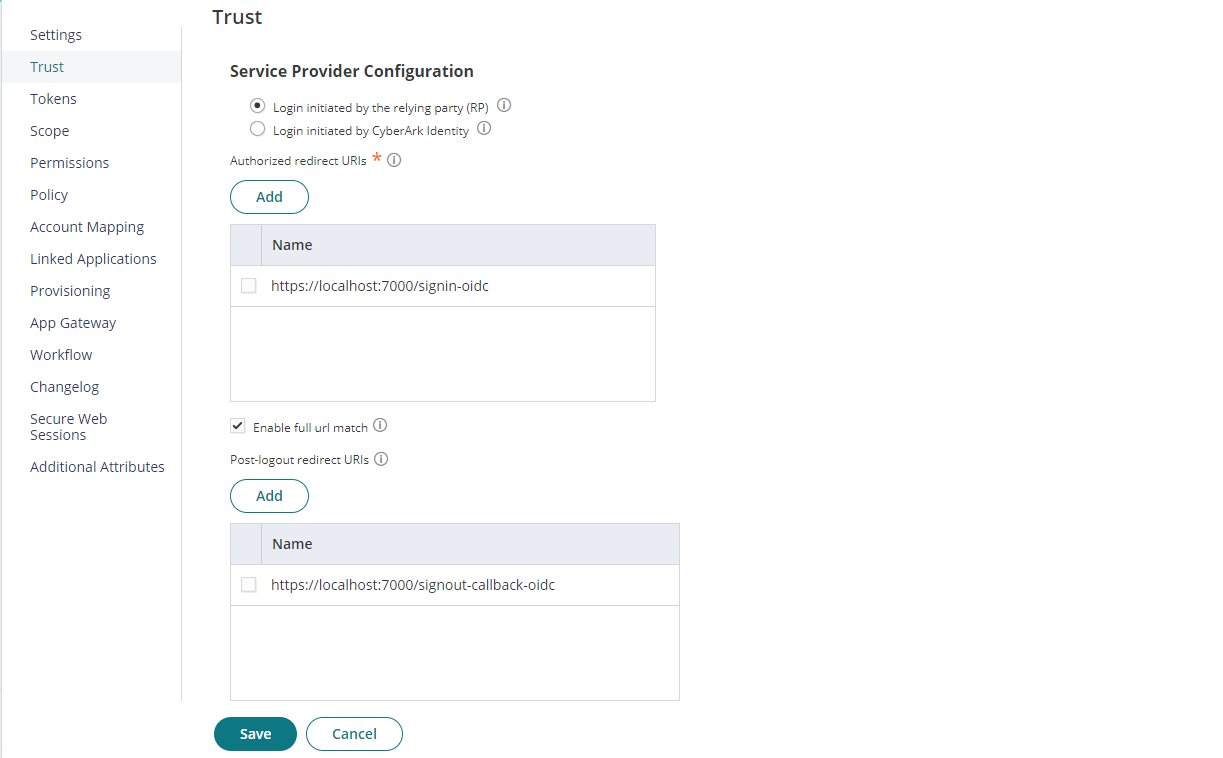
Under Service Provider Configuration, Select Login initiated by the relying party (RP). Add Authorized redirect URIs value to https://localhost:7000/signin-oidc and add Post-logout redirect URIs value to https://localhost:7000/signout-callback-oidc, then click Save. These URI values align with what the ASP.NET Core OIDC middleware expects.
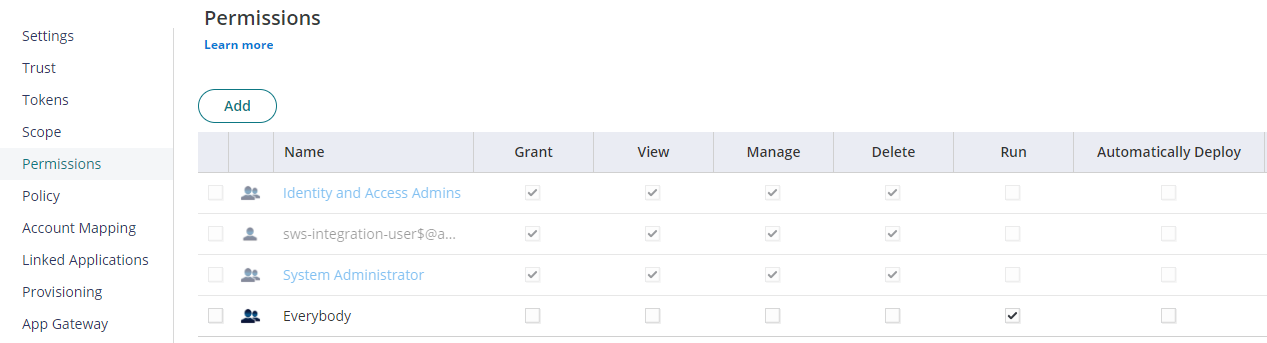
Click on Permissions tab, add a user or role or group and select Run access then click Save to deploy. For demonstration purpose, here I added Everybody role.
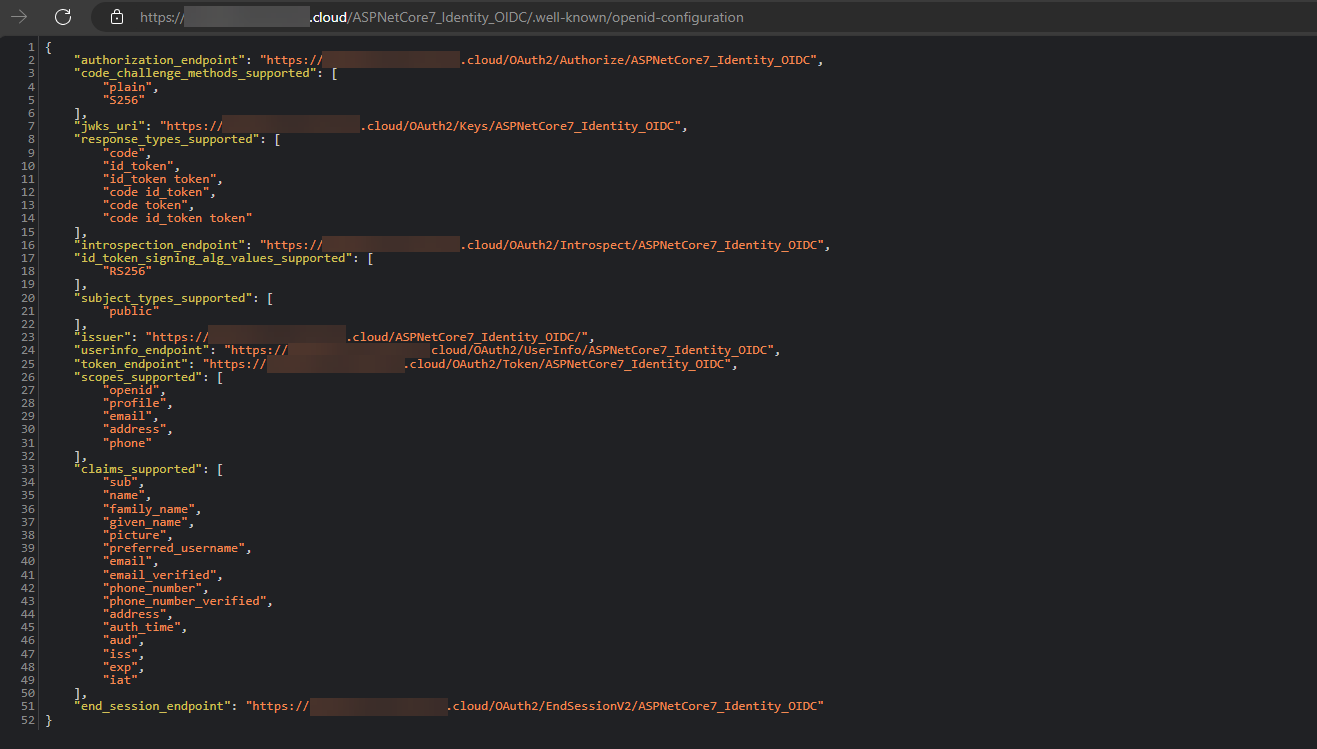
Once Web App is saved, Identity Provider metadata can be requested using the URI https://<tenant_url>/<application_id>/.well-known/openid-configuration. This metadata will provide the information of endpoints, supported response types, default scopes & claims, etc.,
Create and Configure ASP.NET Core 7.0 Application for Authentication
Microsoft article reference to create ASP.NET web app for authentication.
Open terminal and navigate to the location in which to create a new project. Enter the following commands to make a ASP.NET project and install the relevant packages.
dotnet new mvc -n identity-oidc

cd identity-oidc
dotnet add package Microsoft.Identity.Web.UI
Open the project in VS Code, edit appsettings.json file and replace the existing code with the following then replace the values with your tenant and application values.
{
  "cyberark": {
    "Authority": "https://<tenant_url>/<application_id>/",
    "ClientId": "<client_id>",
    "ClientSecret": "<client_secret>",
    "CallbackPath": "/signin-oidc",
    "SignedOutCallbackPath": "/signout-callback-oidc"
  },
  "Logging": {
    "LogLevel": {
      "Default": "Information",
      "Microsoft.AspNetCore": "Warning"
    }
  },
  "AllowedHosts": "*"
}
In the properties/launchSettings.json, In https section of profiles, change the https URL port to 7000 in applicationUrl to match the port in CyberArk Identity OIDC redirect URIs.
In the program.cs file, add the below code right before builder.Services.AddControllersWithViews(). CyberArk Identity by default issues openid and profile scopes in the token, here we are requesting an additional email scope.
builder.Services.AddAuthentication(options => {
    options.DefaultScheme = CookieAuthenticationDefaults.AuthenticationScheme;
    options.DefaultChallengeScheme = OpenIdConnectDefaults.AuthenticationScheme;
})
.AddCookie()
.AddOpenIdConnect(options => {
    options.SignInScheme = CookieAuthenticationDefaults.AuthenticationScheme;
    options.ClientId = builder.Configuration["cyberark:ClientId"];
    options.ClientSecret = builder.Configuration["cyberark:ClientSecret"];
    options.Authority = builder.Configuration["cyberark:Authority"];
    options.ResponseType = OpenIdConnectResponseType.Code;
    options.GetClaimsFromUserInfoEndpoint = true;
    options.Scope.Add("email");
    options.SaveTokens = true;
});

builder.Services.AddAuthorization();
In the program.cs program.cs file, add the below two lines after app.UseRouting() for the app to use Authentication and Authorization.
app.UseAuthentication();
app.UseAuthorization();
Now that web app is configured to use CyberArk Identity as the OpenID Connect Identity Provider, add the necessary login and logout actions to the web app to actually utilize OpenID Connect for authentication.
Add a new controller called AccountController.cs with the following code: It has two actions SignIn() and SignOut().
using Microsoft.AspNetCore.Authentication.Cookies;
using Microsoft.AspNetCore.Authentication.OpenIdConnect;
using Microsoft.AspNetCore.Mvc;

namespace identity_oidc.Controllers
{
  public class AccountController : Controller
  {
    public IActionResult SignIn()
    {
      if(!HttpContext.User.Identity.IsAuthenticated)
      {
        return Challenge(OpenIdConnectDefaults.AuthenticationScheme);
      }
      return RedirectToAction("Index", "Home");
    }

    public IActionResult SignOut()
    {
      return new SignOutResult(new[]
      {
        OpenIdConnectDefaults.AuthenticationScheme,
        CookieAuthenticationDefaults.AuthenticationScheme
      });
    }
  }
}
Now add the sign-in and sign-out user experiences. In the /Views/Shared folder, add a file called _LoginPartial.cshtml and add the following code:
@using System.Security.Principal

<ul class="navbar-nav">
@if (User.Identity is not null && User.Identity.IsAuthenticated)
{
    <li class="nav-item">
        <span class="nav-link text-dark">Hello @User.Claims.First(c => c.Type == "http://schemas.xmlsoap.org/ws/2005/05/identity/claims/givenname").Value</span>
    </li>
    <li class="nav-item">
        <a class="nav-link text-dark" asp-controller="Account" asp-action="SignOut">Sign out</a>
    </li>
}
else
{
    <li class="nav-item">
        <a class="nav-link text-dark" asp-controller="Account" asp-action="SignIn">Sign in</a>
    </li>
}
</ul>
Next, add a reference to _LoginPartial in the _Layout.cshtml file. Place the below code after the navbar-collapse div class.
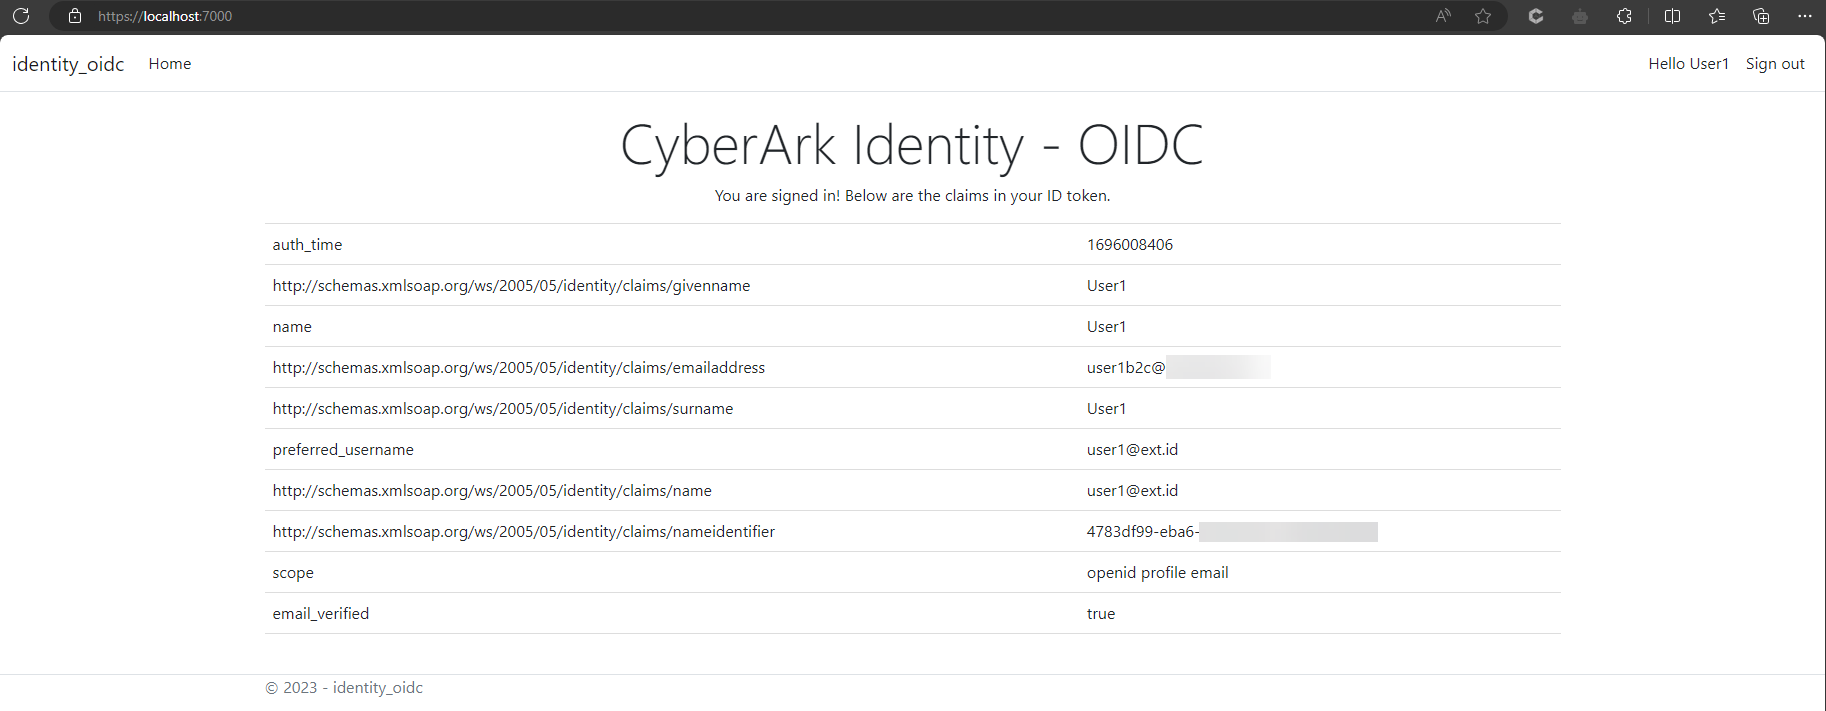
<partial name="_LoginPartial" />Finally, to view the ID token claims add the below code: It will check that user is authenticated and list out the ID token claims.
@if (@User.Identity is not null && @User.Identity.IsAuthenticated)
{
   <p>You are signed in! Below are the claims in your ID token</p>
   <table>
      <tbody>
        @foreach (var item in @User.Claims)
          {
            <tr>
              <td>@item.Type</td>
              <td>@item.Value</td>
            </tr>
          }
     </tbody>
   </table>
}
Save all the code and return back to the terminal. Run the below command to launch the web application.
dotnet run --launch-profile httpsOpen a new private browser, and enter the application URL into the browser, in this case https://localhost:7000. Once successfully authenticated on CyberArk Identity, browser will be redirected to home page with returned user identity claims.
The final code for this post, can get it from GitHub.